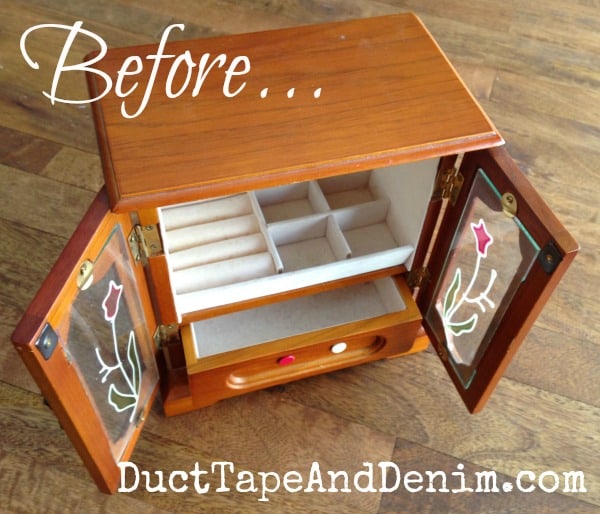
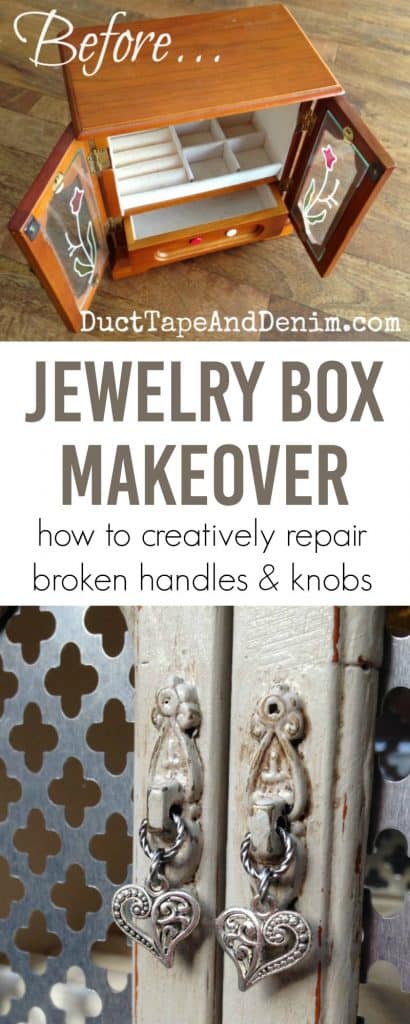
This is a vintage jewelry cabinet that I bought at Goodwill. Isn’t it “beautiful”? Well, I’m sure someone once thought it was beautiful. And it will be beautiful again!

This post contains affiliate links. You won’t pay any more when you use these but I will earn a small commission on any purchases you make after clicking on them and I greatly appreciate it. Thanks for helping support my little blog!!!
{{{ Sign up to receive all my thrift store makeovers in your inbox! }}}
Vintage Jewelry Cabinet Makeover
This vintage jewelry cabinet had a few little issues with it’s handles. One of the door handles was broken and the handle on the inside drawer was gone. Someone had replaced it with some tacks. Not exactly what I would have used! Other than that it was solid and clean… a great candidate for a vintage jewelry cabinet makeover!
I’ve had several people comment recently that they don’t buy these in thrift stores because they don’t like the fake stained glass in the doors. Let me tell you, that is the EASIEST thing to replace in the whole project! As you can tell in the photo below, the glass is just held in by two little metal pieces with tiny screws. Remove those and the glass just pops out! (Save it though to measure the metal that you’ll use to replace it.)
Here’s what it looked like after it’s makeover!

I put on a couple of thin coats of CeCe Caldwell’s Seattle Mist, ran a wet cloth over the edges to distress it a bit, and added a coat of Minwax Polycrylic ![]() after it dried. I could have stopped there but after the polycrylic dried I thought it still looked a little too clean so I watered down some Minwax Express Color in walnut
after it dried. I could have stopped there but after the polycrylic dried I thought it still looked a little too clean so I watered down some Minwax Express Color in walnut![]() , brushed it on, and quickly wiped that off with another soft cloth.
, brushed it on, and quickly wiped that off with another soft cloth.
You can see in the next photo that it left a little in the crevices for a more used look.
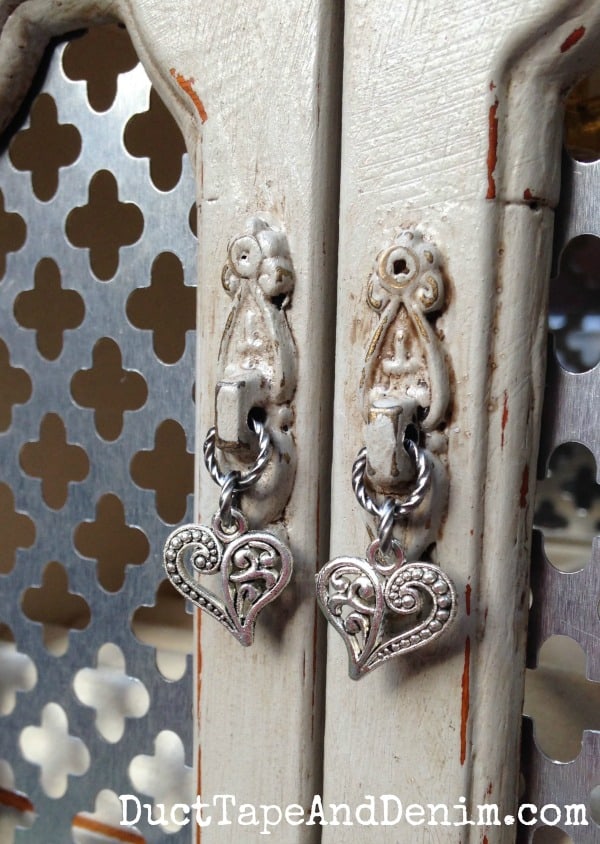
Then I pulled out my jewelry supplies to fix the handle. First I cut off the good handle so the sides would match. Then I picked some charms I liked and added them with some jump rings.
The doors were pretty easy, too. I traced the glass pieces onto the metal![]() , cut it with tin snips
, cut it with tin snips![]() , stuck it back in the door, and replaced the metal pieces that were holding the original glass in.
, stuck it back in the door, and replaced the metal pieces that were holding the original glass in.
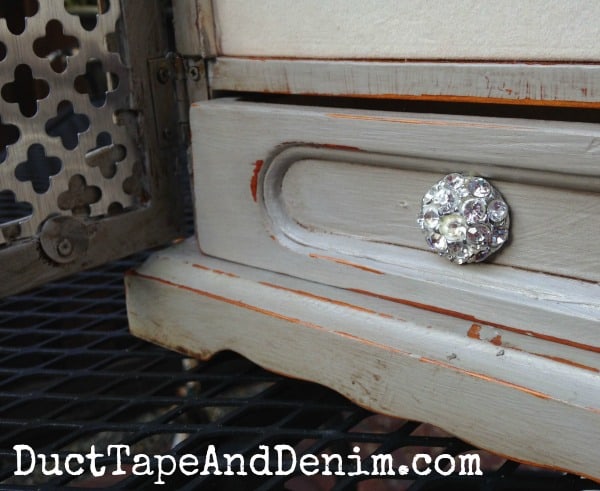
Notice no more tacks on the inside drawer either! I used E6000![]() to glue on a vintage rhinestone button.
to glue on a vintage rhinestone button.
This one went fast! It already sold at the last Paris Flea Market sale and is now back in use organizing our customer’s jewelry!
Here are a few more jewelry cabinet makeovers:
- Jewelry Cabinet Makeover with Missing Knob
- Jewelry Cabinet Makeover | Pink
- Jewelry Cabinet Makeover | Folding Door
- Stenciled Jewelry Box
- Jewelry Box Makeover | Bird Stencil
‘Til the next project,
Ann @ Duct Tape and Denim
Pinterest | Instagram | Facebook | Twitter | Etsy | YouTube

Originally published May 2, 2015. I share at these blog parties.
Teresa says
Jewelry boxes are some of my favourite pieces to work on. Every year I sell tons of them before Christmas. It allows me to be really creative on a small piece.
ducttapeanddenim says
My feelings exactly. I like trying out new ideas or techniques on a small piece.
Florence says
I love the makeover Ann! What an improvement to get rid of that glass! Do you buy jewelry cabinets if they are missing drawers, or do you pass on those?
ducttapeanddenim says
I haven’t yet but I have one in my stash to work on. You’ll see it someday!
Barb says
Why does everyone follow “the trend?” I think that jewelry box would look much better with a smooth coat of white paint instead of the distressed look. It’s okay to have something new and pretty – it doesn’t have to look old. I do like the “screen” you put on the glass instead of the flowers.
ducttapeanddenim says
Thanks, Barb! What I LOVE about DIY projects is that you can make it look the way you want. I happen to like the distressed look but I do also leave some smooth. Take a look at this jewelry cabinet. I used a paint sprayer that created an AMAZING smooth coat so I didn’t distress it at all: http://ducttapeanddenim.com/paint-sprayer/
Also, since I sell these I make a variety and tend to make more the same style as the ones that sell. And distressed sells where I am. I do appreciate your comment. Thanks!
Sandy W. says
Where do you buy the metal screen?
ducttapeanddenim says
I get it on Amazon… here’s my affiliate link: http://amzn.to/2srGjn4
FLORENCE @ VintageSouthernPicks says
You know, when I looked at this before, I totally missed that you added those little charms to the door handles! What a great idea I never thought of, and a super way to fix the missing handle problem. Also like the rhinestone button much better than the tacks, LOL! I can see why it sold right away!
Melissa D . says
Hello ,
What type of material do you like to use for the inside of the box ? I thought about felt or some crazy
print material . What are your ideas on this ?
Love what you do with the boxes .
Melissa
ducttapeanddenim says
I’ve used felt, burlap, tissue paper, and paint. Felt is my favorite. It comes in so many colors, too, that you can so something fun.
Gina Fritzke says
I was wondering if you could give an idea what you sell your jewelry boxes for? I know it depends on location, time of year, paint finish, etc. I’m just looking for a ballpark figure (or range) because that’s the hardest part for me! 🙂
Gina from California
ducttapeanddenim says
I don’t know if I would be the best one to answer this… I sell mine for $25-45, depending on a lot of different things – Size, finish, where I’m selling it, etc. I see them for $75+ on Etsy. But I’m fine with selling them for less because I do make some ad money when I share them on the blog. And I just enjoy doing it and don’t want to ship them!
Zaleina says
I can’t believe this is the same jewelry case – you saved it! I wish I kept my old one so I could attempt to create your gorgeous vintage look…
ducttapeanddenim says
They’re still easy to find at thrift stores. Give it a try!
Dawn says
I keep seeing in various makeovers where you’ve covered the stained flocked areas with tissue paper. I know you said you use spray adhesive, but how do you get it so perfect looking on the little rounds for the rings? I try not to get painting any of it…taping it off and yet sometimes the cone to me with stains & I want to either try to clean them or cover it up. What’s the easiest, prettiest, cover to use? And how?
ducttapeanddenim says
I’ve found that thicker paper works better on the ring holders.