I’m just a little excited about today’s thrift store makeover, a big jewelry box that I stenciled. For a long time I’ve avoided jewelry boxes, preferring to only buy the old jewelry cabinets. But I found this one for only $1.99 and it was in great shape so I bought it.

This post includes affiliate links. You don’t pay any extra for using those but I will receive a small percentage of anything you buy and I greatly appreciate it!
Sign up to receive all my thrift store makeovers in your inbox!

I really wish I had remembered to take a picture of it before I started but, like with so many of my thrift store projects, I was too excited about painting it. I did find a jewelry box almost exactly like it in March. You can see it in this thrift store haul video.
How I Stenciled my Big Jewelry Box from the Thrift Store
I used CeCe Caldwell natural chalk and clay paint on this so it didn’t require any prep at all. I just wiped off the dust. It took two coats of Seattle Mist to get the color I was looking for. Then I stenciled it with Vintage White.
These are the same two colors I used on my bird stenciled jewelry box, too!
I’ve had this stencil so long I don’t even remember what brand it is so I can’t give you purchasing info. But there are a lot of fleur de lis and flourish stencils on Amazon to choose from.
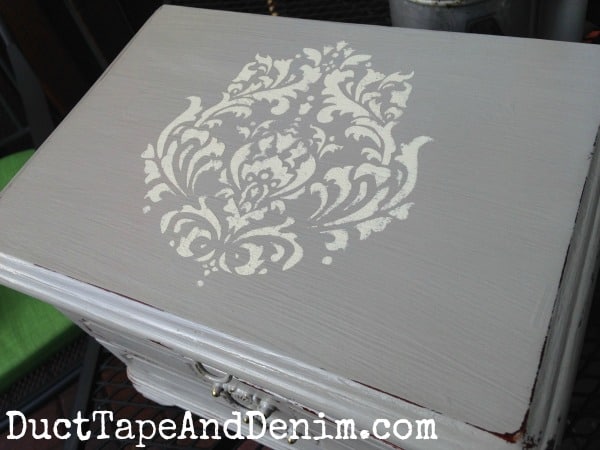
I wet distressed the paint before stenciling. That just means I took a damp cloth and rubbed along the edges to remove some of the paint. You can remove as much or as little as you want. Most chalk paints wet distress really well.
I sprayed the back of the stencil with spray adhesive and waited 5 minutes before sticking it to the lid. That time delay makes the bond temporary instead of permanent so I’m able to paint through the stencil and then easily peel it off.
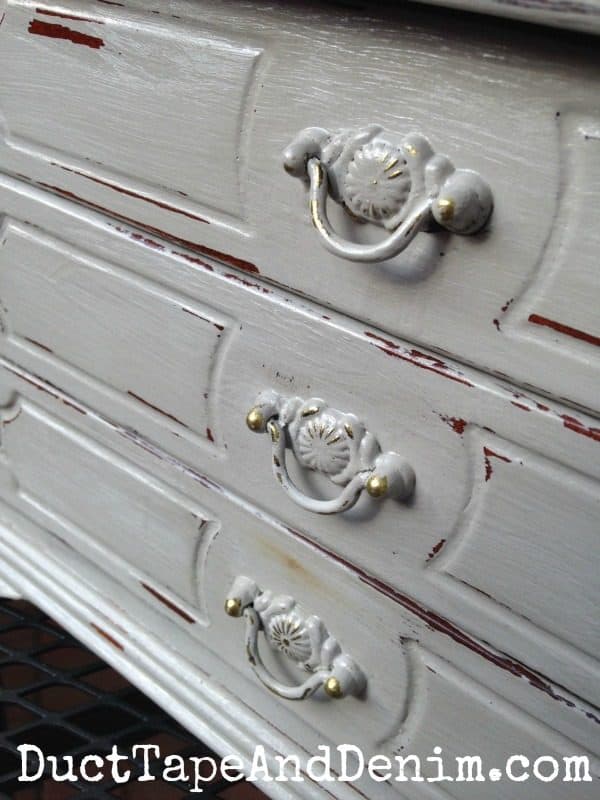
When all the paint was dry I covered it all with one coat of Minwax Polycrylic.
Here’s a close up. I just painted over the handles on this one… so much easier! I wet distressed the handles, too, so some of the gold showed through.
Hope you enjoyed this big jewelry box makeover, now take a look at these other ideas for painted jewelry boxes!
- Jewelry Boxes with Burlap Paper, Fabric, and Paint
- Blue Jewelry Box with Tissue Paper Liner
- DIY Jewelry Box Makeover, from Polka Dot Chair
- Spray Painted Jewelry Box, from Little Green Notebook
- Painting Jewelry Boxes – one of my older posts!
Now I have another thing to look for on my thrift store trips — old jewelry boxes! Please leave a comment and let me know if you’ve ever painted a thrift store find. I’d love to see it if you have! We share at these blog parties.
‘Til the next project,
Ann @ Duct Tape and Denim
Pinterest | Instagram | Facebook | Twitter | Etsy | YouTube
Angela Current says
So beautiful! I have an antique jewelry box that had the finish damaged and think I’ll do this with it. Such a wonderful look. Thank you for the share!
Ann says
Cute makeover! Thank you for sharing at Party In Your PJs!
Sherry says
Thanks for sharing at Home Sweet Home!
Kathy A says
Seeing as I fairly new to your blog, I haven’t seen your old posts so I really enjoyed seeing this one. I have a “stash” of 2 jewelry boxes that I want to upcycle this winter after Christmas (winters are LONGGGG here in Maine!). I’m still collecting ideas right now!
ducttapeanddenim says
Great! I hope you find a lot of ideas here and I’d love to see how yours turn out.
Jenny says
It’s cute. I wish you’d included written instructions (I do better reading).
ducttapeanddenim says
Thanks for your comment. I’ll remember that in the future.
Julie says
What is the difference between wet distressed and just sanding the edges? I mean I know the difference between the two, but when would you use one over the other?
ducttapeanddenim says
Supposedly wet distressing gives a more natural look. It needs to be done before the paint cures. You can layer colors by letting the first layer of paint cure for 24-48 hours, adding a second color, and wet distressing after it dries. Sanding can take off both layers of paint. It’s a little harsher look. Does that makes sense?
Jeri says
Very helpful info! Great question and great answer. Thank you!