A little over twelve years ago, before I started my blog and business, I tried to get my craft projects published in “real” magazines. Remember those? The kind you had to go to the store and buy. Or wait patiently until the mailman delivered it to your physical mailbox. I had quite a few published. You can see some of those projects HERE.
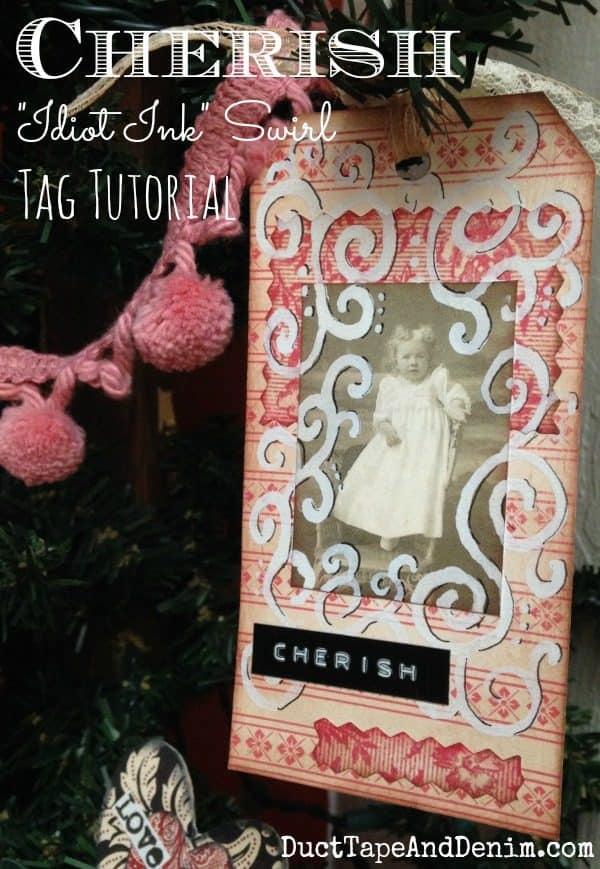
Here’s one of the items that I sent to Somerset Studio Magazine (one of the Stampington & Company creative magazines), but it didn’t make the cut. So I’ll “publish” my article here. This makes a cute Christmas or Valentine tag or any other occasion. I also hung it on my Valentine tree.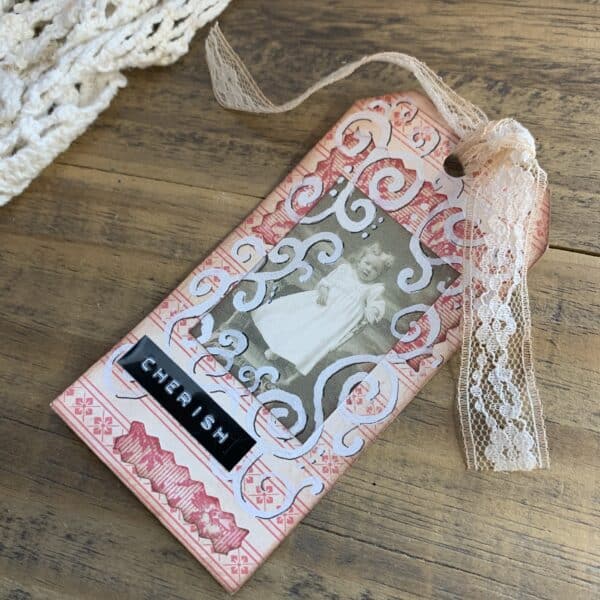
This post contains affiliate links. You won’t pay any more when you use these but I will earn a small commission on any purchases you make after clicking on them and I greatly appreciate it. Thanks for helping support my little blog!!!
{{{ Sign up for our email newsletter and get ALL my future projects sent straight to your inbox! }}}
I happened upon this technique several years ago when I was searching for a white pen to draw on some of my darker papers. I had seen a white Sharpie online and thought I’d look in the office supplies section of Wal-Mart to see if they had any. No, not here either. But wait… there’s a white pen. It was a Bic Wite-Out pen.
I didn’t know if I could use it to write with or not but for around $2.00 each it wouldn’t hurt to try. I was really happy with how it turned out. I had so much fun I used up the pen on the first day. I lovingly call these my “idiot ink” tags. That’s what my mom always called correction fluid and the name kind of stuck.
Valentine Tag Supplies
- Shipping Tags

- Bic Wite-Out Pen
- Sharpie Ultra Fine Black Marker
- DYMO Label Maker
- Autumn Leaves scrapbook paper (or paper of your choice)
- Colorbox Chalk Ink, Chestnut Roan (UPDATE: The chalk ink has been discontinued but they make the same color in a different type of ink.)
- Vintage Seam Binding (I tea stained this piece.)
- Images
- UHU Glue Stick
- Bone Folder
- Scissors
- Hole Punch
How to Make Valentine Tags
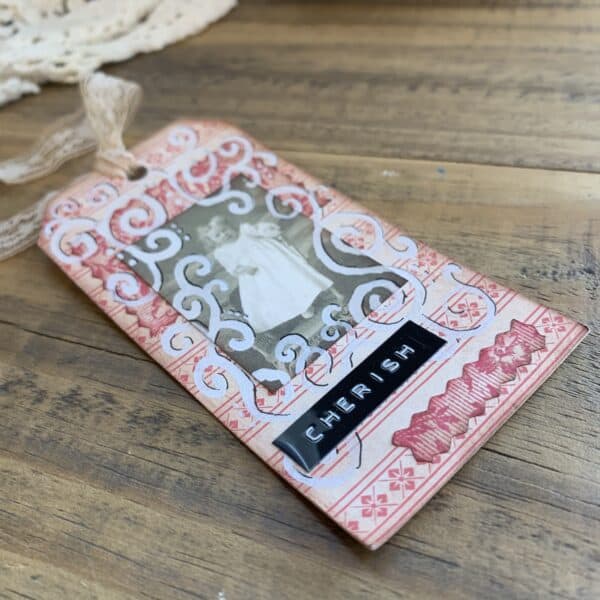
- Completely cover one side of the shipping tag with adhesive. I used a UHU glue stick for this project. Press down onto the wrong side of the paper. Turn over and rub a bone folder over the right side of the paper. Trim with scissors. Punch hole. Repeat on the second side of the tag. Ink edges of small scraps of coordinating paper, glue to tag, and rub with a bone folder.
- Edit your photo to black and white and size. Print, cut, ink edges, and glue to tag.
- Ink edges of the tag.
- Draw swirls and scribbles around the photo, overlapping at points. Allow drying.
- With the black fine point pen, draw highlights on white scribbles.
- Lightly rub the ink pad over the white scribbles to age them just a bit.
- Print word with Dymo label maker & attach.
- Tie vintage seam binding through the hole.
This was originally written before chalkboards became so popular but you could also use a chalk pen![]() . The Uchida pens are the ones I use.
. The Uchida pens are the ones I use.
If you make one, please send me a link to your photo! I’d love to see what you can come up with. And please pin my photos! Thanks!!!
My Finished Gift Tag

To see more of my Valentine’s Day decorations check out these blog posts. You can also follow my Holidays | Valentine’s Day Pinterest board for even more ideas. I would appreciate it if you pin the photos from this post.
More Fun Valentine Crafts to Make
If you enjoyed this post, you might also like these:
- My Valentine Tree
- DIY Valentine Pillow in 15 Minutes
- Quick and Easy Projects for Valentine’s Day, Stampington Magazine
- Handmade Valentines, Michaels
- Valentines Day Garland
If you make a Valentine tag, send me a picture. I’d love to see how yours turn out!
‘Til the next project,
Ann @ Duct Tape and Denim
Pinterest | Instagram | Facebook | Twitter | Etsy | YouTube
Originally published on March 12, 2009.
onemotherslove says
So you just free-handed your white-out swirls on top of everything? I love swirls. They’re my favorite shape! I’d like to see a LARGER photo!
trisha too says
what a neat idea! (idiot pen, that’s a good one.) will definitely try this, thanks for the tip.
yippeevintage says
Your tags look great… love the tutorial! The swirls look like they’re floating with the black ink 3D-ness. A word to the wise… never idiot-ink your fingernails. I did it once when I was a kid and it’s very difficult to remove 🙂
thecraftbegins says
Pretty clever!
Ana Love Craft says
Beautiful tag! All details are great!
Have a lovely weekend!
Hugs and love from Portugal,
Ana Love Craft
http://www.lovecraft2012.blogspot.com
Jann Olson says
I think it turned out super cute! Love the name of the pen too. Thanks for sharing with SYC.
hugs,
Jann
Emily @ Two Purple Couches says
Very cool! Thanks for linking up at Creative Spark; hope you’ll join us again this week 🙂
Felecia says
The tag is so unique! I love the unusual items you used to create this tag! It’s lovely! Thanks for sharing! Blessings from Bama!
Elizabeth says
So cute. I love handmade tags/notes. Beautiful. Thank you for linking up at Snickerdoodle. Hope to see you Saturday!
Barb @ A Life in Balance says
Thank you for submitting to Motivation Monday!
Patricia Krank says
Your tags are darling! I’m thinking of doing this for our family Christmas tags next year, using photos of my girls (in black and white) from when they were children. How special that would make their gifts! Thank you for the tutorial. Pinning!
Blessings to you,
Patti
ducttapeanddenim says
Patti, that’s a great idea! Let me know when you do these. I’d love to see them.
Cheri Mello says
ADORABLE 🥰I LOVE ❤️ IT👏🏼👏🏼❗️Thank YOU Ann!!! G-d♥️Bless😊
Ivory says
Simply adorable! Turn out lively, and I am in love with thus idea
Kathy A says
Love the phrase “idiot ink”! I wonder if today’s kids know how hard it was to erase a typed error!!! This tag reminds me of your ” You Better not pout” tags. I made them for Christmas and I was so pleased with the results!
ducttapeanddenim says
Yay! I’m so glad to know that someone else made them. Have fun crafting.