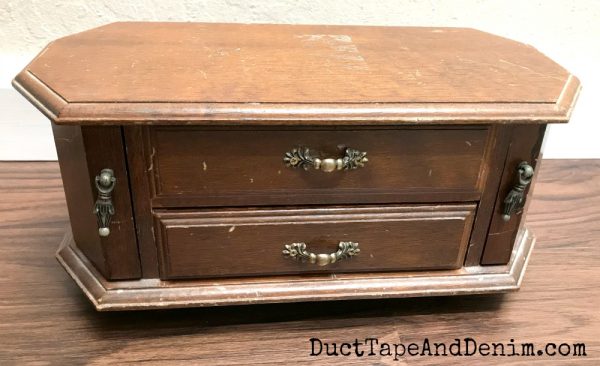
We’re back today with another thrift store challenge! Would you have bought this old jewelry box? There was a time when I would have passed this one up but I’m beginning to love the old jewelry boxes as much as the bigger jewelry cabinets. I’m constantly practicing new painting techniques on these sad little castoffs. This one got a huge makeover with a paint pour technique that I was dying to try.
This post contains affiliate links. You won’t pay any more when you use these but I will earn a small commission on any purchases you make after clicking on them and I greatly appreciate it. Thanks for helping support my little blog!!!

Supplies Needed for Paint Pouring Technique
- 5-7 colors of paint – I used Treasure for the body.
- pouring medium
- small cups (2-4 oz)
- 1 larger cup (6-10 oz)
- tongue depressors
- paintbrush
- varnish
- sanding block
- metallic wax
{{{Find all my favorite jewelry box makeover supplies in my Amazon shop.}}}

How to do the Paint Pour Technique
First, I painted the jewelry cabinet (except for the top of the lid) with chalky finish paint in a dark turquoise. I used Treasure. When that was dry I added a coat of varnish.
Later I decided it was too dark and plain so I went back over it with a whitewash. I used Everlasting. When that was dry, I sanded it lightly with my sanding block.

Now for the really fun part! I taped off the part I had already painted ’cause I knew this was gonna get messy.

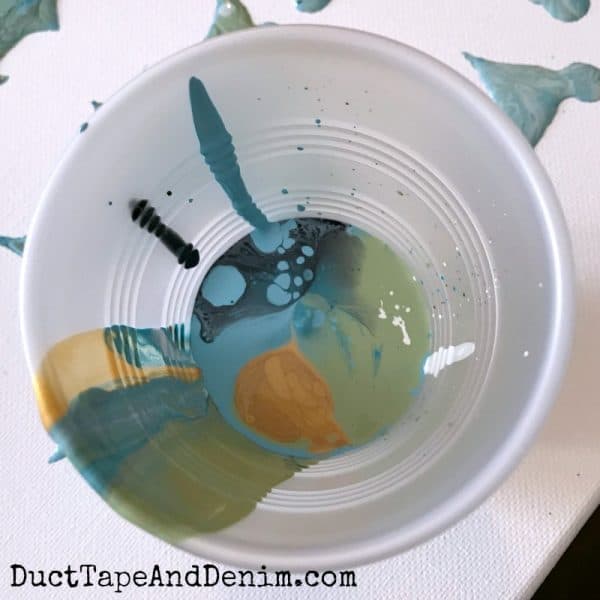
Now to prep the paint for the paint pour.
You’ll need a small cup for every color. Mix an equal amount of paint and pouring medium. You may have to adjust this depending on the thickness of the paint. I was using chalky finish paint and a couple of them I’ve had for a while. They were thicker so I added a bit more pouring medium. Just play around with it ’til it pours smoothly.
Mix each color individually with a tongue depressor.

Next, the part that still terrifies me. Pour all the colors into one big cup! This is called a dirty pour.
I didn’t have my tripod set up and I definitely couldn’t hold the camera while I was pouring so take a look at this short video showing the process.
See what a mess I made? Even my arms were covered in paint. But it was a LOT of fun.
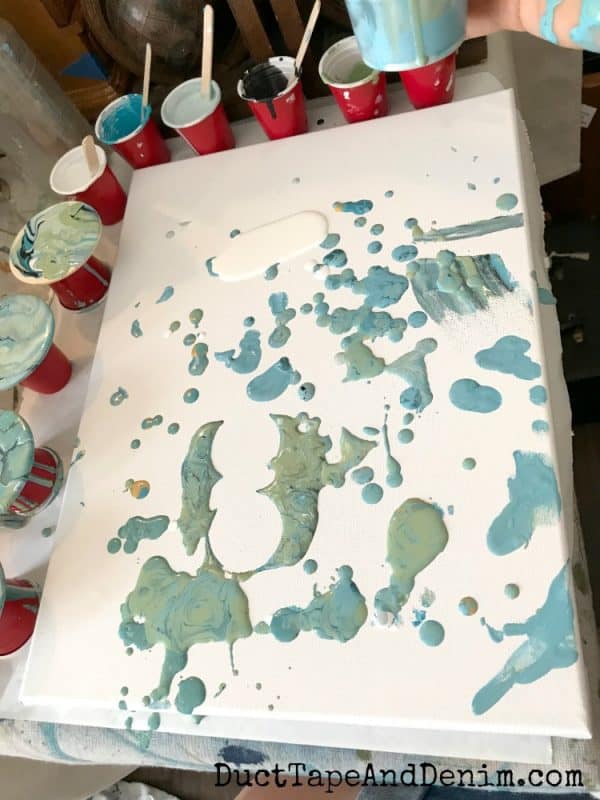
I put that canvas under the jewelry box as I let the paint drip off the sides. Then I poured all the extra paint on and spread it around the canvas. Now I have a piece of art that matches my jewelry box!
The handles needed just a little freshening up to, so I used some metallic wax.
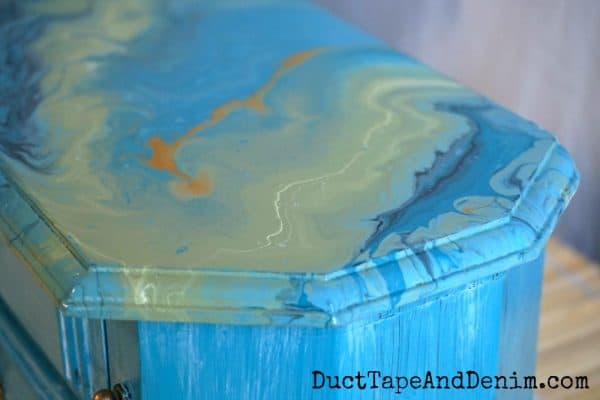
The Finished Turquoise Paint Pour Jewelry Box
And here’s how the top turned out… what do you think?
This was a lot of fun so I’m sure you’re gonna see this technique again.

More Fun Upcycle Projects
If you enjoyed this paint pour thrift store makeover, check out what everyone else did this month:
‘Til the next project,
Jenny says
The top is beautiful and what a cool method to use. Your jewlery box is beautiful!
Amanda @ Domestically Creative says
Ok, this is just too cool! I want to try paint pouring so bad!
Gail says
Paint pour is the latest trend and your jewelry box top looks awesome using this technique. Thanks for including a video tute. I’ve never seen it done before and really want to try it. I have plain canvas boards just waiting to be filled using paint pour!
Kathy A says
I like the marble swirl effect. I have done some marbling with sponge painting, then adding lines with a feather. Your way looks easier!
Debrashoppeno5 says
This is so cool looking. It does look like it was a lot of fun.
Wendy Riggs says
That is REALLY cool!!! I like the way your jewelry box turned out! The tutorial video makes me want to try it with a canvas. I might have a hard time with the mess part, though. Lol! How did you do it on the top of your box? The video shows them putting the canvas upside down on the cup & then flipping it all over. You couldn’t do that with the cabinet, could you??
ducttapeanddenim says
lol… Wendy, you’ve just got to make a mess! I actually poured it onto the top of the jewelry box instead of flipping it over. That was easier with this project. I’ve done the flipping on a canvas before and it was a lot of fun too.
Janet says
I’m going to have to try this – I’ve never heard of the paint pour method… but it looks really cool on the jewelry box. Thank you for sharing it!
Grandmas House DIY says
OMG I love that color! Thanks for sharing with us at the To Grandma’s house we go link party!
Maria says
Love the method.
Michelle Leslie says
Now THIS is brilliant. GHow unique and gorgeous
Maria says
Thanks I really learned something! Your tutorial was perfect!
Cheryl Atkinson says
I love it but then I love all your jewelry boxes. I have several big ones that are the flat kind. Maybe I should try this. Thank you for sharing.