It has been a LONG time since my last thrifted jewelry cabinet makeover! I had to step back a little from my blog and some repurposing projects because the part of our business that actually makes money (…lol…) got a little overwhelming. And that’s actually the part of the job I need to focus on. Gotta make money, right?
Meanwhile, I’ve still been thrifting and my stash has been building up. At the time of this writing, I have 17 jewelry boxes or jewelry cabinets that I’ve bought at thrift stores, garage sales, and flea markets! I better get to work painting!
My goal this year is to paint one a week. So hopefully, I’ll also be able to get those up on the blog so you can actually see how we did these.
And don’t forget to sign up for our email newsletter (scroll down to find the sign-up form) and I’ll send the new ones straight to your inbox when I get them posted.
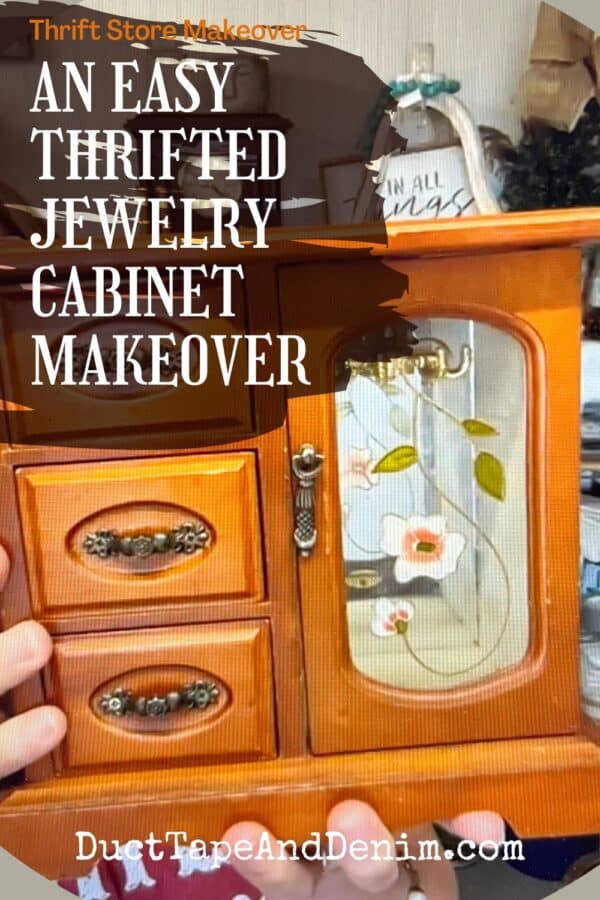
Anyway… on to the project… here’s what the jewelry cabinet looked like when I found it at the thrift store. FYI, my intro won’t be this long every week.

This post contains affiliate links. You won’t pay any more when you use these but I will earn a small commission on any purchases you make after clicking on them and I greatly appreciate it. Thanks for helping support my little blog!!!
Supplies for Thrifted Jewelry Cabinet Makeover
- jewelry cabinet, thrifted
- Dixie Belle, “Dried Sage”
- paint brushes
- sanding block
- Dixie Belle Clear Coat, Satin
- Rub N Buff Metallic Wax, “Gold Leaf”
- rags
{{{See a complete list of what’s in my toolbox and supply cabinet.}}}
Before Video
I bought this jewelry cabinet so long ago that I don’t even remember where I found it. I included it in a thrift haul that I did on Facebook recently. There was an ice storm the week before so I didn’t get out to thrift. But I didn’t need to — between the SheShed, attic, and storage unit, I have PLENTY of junk treasures to choose from!
Here’s the video, in case you missed it.
Step-by-Step Instructions
Remove Hardware and Glass
The drawer handles were attached with tiny screws and were easy to remove. The glass was also held in by little pieces of metal and more tiny screws. I did not remove the hinges or the handle on the door.
TIP: Make sure you put all your hardware together in a safe place, ie small jar with a lid, zipper baggie, etc.
Clean
I usually use whatever cleaner I have nearby. These are the cleaners that I usually have on hand:
- Clorox wipes
- Windex (or generic) glass cleaner – for the glass doors but I’ve also used it on the entire piece
- Krud Kutter — Use if the piece feels greasy at all.
- Goo Gone — Great for removing stickers and price tags!
Whatever all-purpose cleaning spray you have will probably work.
Painting Tips
- This light green chalk paint needs a couple of coats to cover the old wood finish.
- I always start with the jewelry box upside down so I can see parts that I might miss otherwise.
- If your chalk paint seems thick add a bit of water OR
- Use a mist sprayer to get the wood surface slightly damp before painting.
- Allow the first coat to dry completely.
- For the second coat, either water down a little of the paint or dip the paintbrush in water before dipping in the paint.
- Use a small artist’s brush to get into small, tight areas.

Distress
I used a 180-grit sanding block but you could also use sandpaper or wet distress. Take off as much or as little paint as you want.
If you don’t want a distressed look, sand very lightly with 220-grit sandpaper.

Top Coat
After wiping off all the sanding dust, I gave the jewelry cabinet one coat of Dixie Belle Clear Coat Satin and let it dry overnight.
Wax Hardware
Sometimes I paint the hardware, sometimes I don’t do anything to it. But on this project, I used Rub N Buff Metallic Wax in “Gold Rush”. I squeezed out a tiny bit on my finger and lightly rubbed it across the surface of the handles. Then I buffed it off with a soft cloth.
Replace Hardware and Glass
After the top coat has dried overnight, I replaced the hardware and glass.
Sometimes I replace the glass with metal or screening, but after seeing the “ugly” flower with the new green paint I decided to leave it. I guess that was a good decision since the jewelry cabinet sold in my antique mall booth within a week! (For those of you who are wondering, it sold for $30.)
After Video
Glenn is currently working on a video showing step-by-step how I did this project. Until then, watch this little Facebook live recap video of the week’s thrift haul makeovers:
FULL VIDEO — coming soon
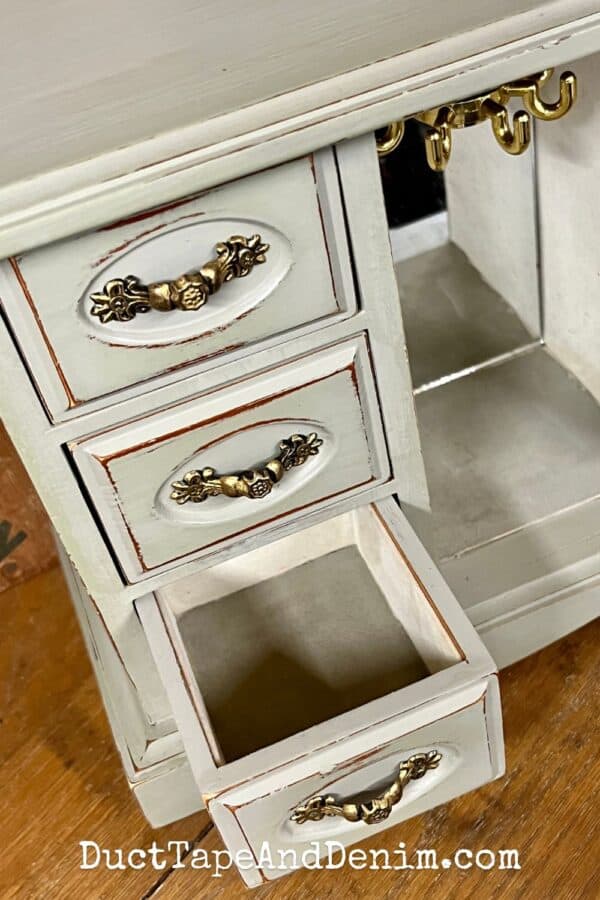
Finished DIY Project
Yes, this was a good color choice. FYI, this paint color has been good to us! We’ve painted several things with it and they’ve all sold within a week!


More DIY Projects
If you enjoyed this post, you might also like these:
- 10 Things You Need to Know Before Trying Jewelry Cabinet Makeovers
- 16 Thrift Store Jewelry Box Makeovers Anyone Can Do
- An Easy Jewelry Cabinet Makeover with Beautiful Gold Wax
- How to Create a Colorful and Unique Turquoise Drip Jewelry Cabinet
- An Easy “Green” Way to Upcycle a Thrift Store Jewelry Cabinet
Thanks for reading! Please let me know if you have any questions about my thrift flips!
‘Til the next project,
Ann @ Duct Tape and Denim
Pinterest | Instagram | Facebook | Twitter | Etsy | YouTube

Diana Patterson says
You did a great job. I liked and I can’t wait to try it. Thanks and keep sharing.
HancockssignetringsDiana Patterson says
Great post! So helpful post. Thanks for sharing wonderful post.