Recently I shared on Facebook that we were doing a makeover on our powder room, aka the “World’s Smallest Bathroom”. The project I was most excited about was the sink. I had wondered how to paint a sink so I did a little research and found what type of paint would work.
This post contains affiliate links. You won’t pay any more when you use these but I will earn a small commission on any purchases you make after clicking on them and I greatly appreciate it. Thanks for helping support my little blog!!!
Supplies Needed to Paint a Sink
I ended up using the Rust-Oleum Tub and Tile Refinishing Kit that I ordered from Amazon. This is a high-quality paint made just for this purpose.
Since the paint kit was only around $25 (at that time), we decided to try it. Then if it didn’t work we’d just rip out the sink and put in a new sink.
- Rust-Oleum Tub and Tile Refinishing Kit in the desired color
- 4″ paint roller
- 1″ paint brush orsponge brush
- painters tape
- plastic sheeting or drop cloth to protect the floor
- scraper to remove caulk
- Comet with Bleach or other scrubbing powder cleanser
- Lime-Away
- scouring pad
- sponges and plenty of paper towels!
- 400-600 wet/dry fine-grit sandpaper or sanding sponge
- tack cloth or microfiber towel
- bucket
Protective Gear
- eye protection
- respirator mask
- gloves
Here’s a little video I took of what my nasty old bathroom sink looked like BEFORE the countertop makeover.
How to Paint a Sink
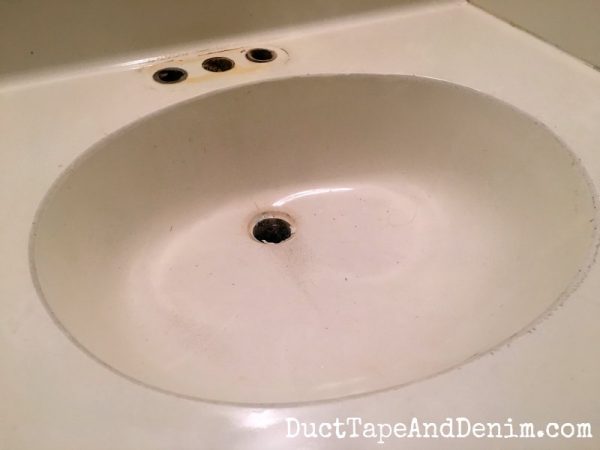
I think the one-piece sink, countertop, bathroom vanity, and handle were all original to our townhouse, built in the mid-1970s!
Note: This was an old one-piece bathroom countertop and sink combination.
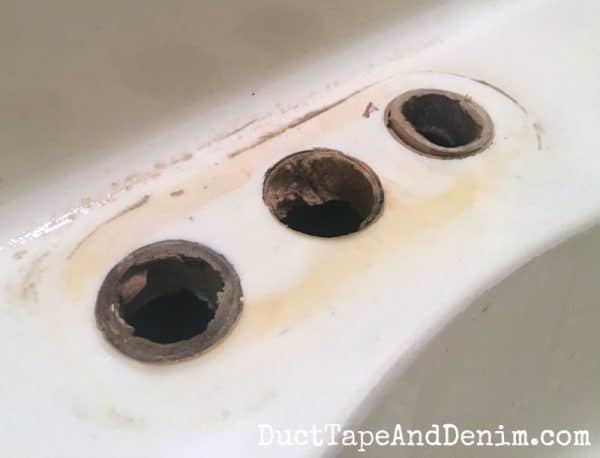
Remove the Hardware
Removed the plumbing hardware: faucet, handles, and drain. Make sure the water is turned off before you do this! Bikeman did this for me.
Honestly, I don’t know what this was made of. It felt like a plastic sink.
Here’s another close-up of the nastiness! I was NOT feeling good about painting at this point.
If there are any cracks, they will need to be repaired. The good news is that ours was still in good condition and there was no water damage to the cabinet even though it had been there a long time!
Cleaning and Preparing the Sink
Proper preparation is the most important thing about painting a sink’s surface! The painting was actually pretty easy but these steps take time. I think I spent about 1 1/2 hours cleaning before I even started painting.
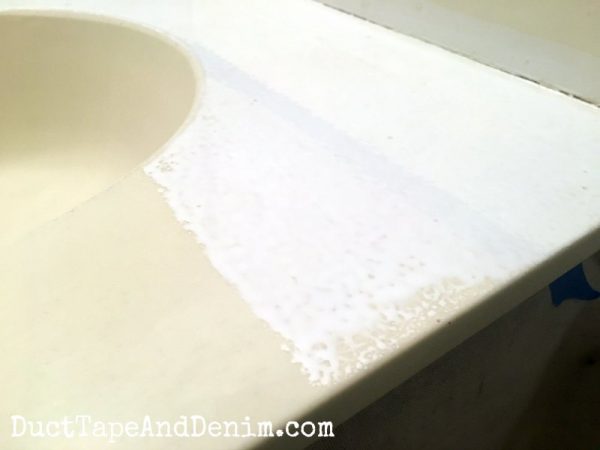
First, remove all the old caulk. Remove debris.

Place a bucket under the sink drain to catch anything that falls through from the top of the sink.
Using an abrasive sponge, scrub with Comet with bleach to remove all the dirt, grease, grime, and soap scum. Rinse off the residue with clean water. Clean with Lime-Away or TSP. Rinse off with hot water.
Then sand, sand, sand until you have a smooth surface. Rinse and wipe off the sanding dust with a tack cloth or a damp cloth. This step will remove the shiny finish and allow the new paint to adhere better.

I also used painter’s tape to cover the walls and surrounding area so I wouldn’t get paint on them. And I also used masking tape to tape down a drop cloth so I wouldn’t accidentally get any paint on the floor.
The Painting Process
Now the scary part. Good ventilation is KEY here.
BEFORE painting, make sure you open all your windows, turn on the exhaust fan, and aim a fan at you to get fresh air.
These paint fumes STINK!!!! I can’t emphasize that enough. Make SURE you have proper ventilation.
Don’t paint with kids or pets in the room. Seriously. It stinks. I mean it…
This was a new paint for me and I learned that there is no need for a primer.
First step, mix the 2 part epoxy paint together, following instructions. The instructions say it can be rolled, brushed, or sprayed. I chose a 4″ mini roller and a 1″ foam paintbrush to get the corners.
The paint is much thinner than I expected it to be. Aim for 2-3 THIN coats over the entire sink and be ready for it to look BAD after the first coat.
Here’s what my first coat of paint looked like after I covered the entire surface. It’s not even, and I could see brush marks, but it’s a self-leveling paint. It looked much better after it dried but definitely needed a second coat. The drying time is about 1 hour between each fresh coat of paint.
See the difference?

The curved sink bowl was a little bit of a challenge but between the foam roller and foam brush, I managed to get it all covered.
Here it is after 3 thin coats of paint.

Next step, I allowed it to cure for three days before we installed the new faucet, handles, and drain and added our decor items.
Sign up for my weekly newsletter & have all our future projects sent straight to your inbox!
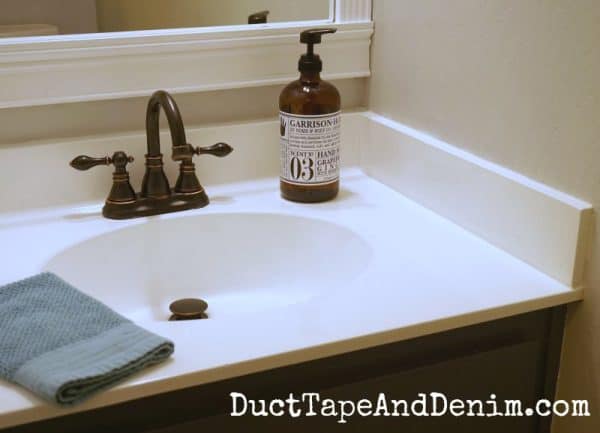
The Finished Painted Sink
And here it is all caulked and with a lovely smooth finish! What do you think? I’m glad I spent the time figuring out how to paint a sink!
How to Care for a Painted Sink
Do not use abrasive cleaners on your painted sink surface or vanity top. I used a regular spray cleaner and a soft, clean cloth
My Review
My review? I love it… so far. I want to reserve the right to change my opinion after I see how the bathtub paint kit wears. But I’ve heard good things from other users — IF you do the prep!!!
That, plus this is in our guest bathroom that doesn’t get daily use. I don’t know if I would do it on a kitchen sink or a sink that receives more regular use. I also haven’t tried it on a stainless steel sink or a porcelain sink.
Should you try painting your sink? Yes, I think it’s a good idea to try painting the surface of the sink before going through the extra cost of replacing your old sink. Especially if you’re on a budget.
UPDATE: This project was originally published on August 14, 2017. We sold our townhouse a little over two years later. I get questions all the time asking how this sink is holding up. When we moved out, it still looked great. It never scratched or peeled at all. And no chips. I was really happy with the finished product and would gladly do it again!
Extra Tips for Painting a Bathroom Sink
I believe painting is a great idea for a long-lasting finish. Especially if you use the following tips:
- Pick the right paint color. Most tub and sink paints come in white and several other different colors.
- Spend enough time on prep. The steps BEFORE painting are the most important! I know I’ve said that several times… I’ve just got to stress it!
- If you use the correct paint you do not need a coat of primer.
- Do not apply a thick layer of paint. Several thin layers are better than a couple of thick.
- Allow about an hour before adding the second coat of paint and any additional coats that are needed. In my case, I needed a third coat.
- What is the best way to clean a painted sink? Gently clean the painted surface with spray cleaner and/or soapy water and a soft cloth.
- I’ve read that a paint sprayer can be used. But I have had bad experiences spray painting inside so I didn’t go that route.
- For the best results, use the right paint and the right materials for the right job and follow the manufacturer’s instructions.
Types of Paint to Use on Sinks
I think I had such good success with this DIY home project because I used the right type of paint.
- 2-part epoxy-based paints such as Rustoleum Tub and Tile Paint — This paint did a great job!
- specialty tub and tile spray paint
- semi-gloss latex paint — I haven’t used this myself so I can’t tell you how long it lasts. You would probably need to use oil-based primers for best paint adhesion.
- Rustoleum Marine Topside Paint — Another one I haven’t used but it makes sense. If it works on boats it should work on a sink!
- appliance spray paint — I used this on my washer and dryer makeover but I haven’t tried it on a sink.
- EP-acrylic paint
More DIY Bathroom Projects
If you’d like to see the other DIY projects from this bathroom makeover, click on the links below:
- How to Paint Bathroom Cabinets — MUCH easier than painting a sink!
- Spray Paint Bathroom Accessories
- How to Frame a Bathroom Mirror
- Spray Paint Bathroom Light Fixtures
- $100 Powder Room Makeover Reveal — This includes all the DIY projects along with before and after photos of the entire makeover.
If you enjoyed this countertop makeover, you might also like these:
- How to Organize a Small Farmhouse Bathroom
- 17 Clever Ideas for Small Bathrooms
- 4 Quick and Easy DIY Bathroom Ideas
- How to Improve Bathroom Lighting
Another question I’ve been asked is, can you paint aluminum sinks? That I don’t know. Please let me know if you’ve ever tried! And let me know if you have any other questions about this or any of our other DIY home projects. We love learning to do all these little things in our home instead of depending on someone else to do all the work for us.
Closing
The Rustoleum kit that we used could also be used for a large bathtub project. But I’ll be honest with you and let you know that when we decided to sell the house we hired someone to come in and do the tub. I remembered the fumes for the little sink and didn’t think I wanted to deal with fumes for a project many times larger. Plus, the guy we hired came in and did the whole tub surround in one day! It would have taken me a week and I can’t go that long without my bathtub and shower! (We only had one full bathroom in this townhouse.)
But, don’t let my giving up keep you from trying this method on a bathtub… it can be done.
Another disclaimer: When we homeowners did this project in 2017, the tub and tile kit was $25. I checked on the price again in 2023 and it had gone up to $48! Just like everything else! But that’s still cheaper than buying a new sink.
Thanks for reading! Do you have any questions about how to paint a sink? Leave ’em in the comments.
‘Til the next project,
Ann @ Duct Tape and Denim
Pinterest | Instagram | Facebook | Twitter | Etsy | YouTube


Mother Deer says
You did a great job! I have the same sink/counter situation in my home, but with more counter. Did you use up the whole epoxy kit, or was there enough left to paint more counter space if you needed it? I’ll be interested in hearing about how well it holds up to cleaning and if color can be added to the epoxy. Thanks for sharing this project 🙂
ducttapeanddenim says
There was plenty left over for more counter. I think it’s supposed to cover a whole bathtub! We’re going to live with our sink for a while to see how it stands up before trying the tub though! I don’t know if you can add color but I’m going to guess not. And I didn’t see it come in any other colors.
Katie says
How has it held up? What do/did you clean it with?
Waiting reply
Katie
ducttapeanddenim says
It still looks great. I just wipe it with all purpose spray cleaner… nothing abrasive. I’m planning another Facebook Live soon so do a follow up.
Mimi says
You painted the actual bowl of the sink too? Did you use the foam brush for that? If it is thin, didn’t it all run down? Same question about the edges of the counter top and back splash.
ducttapeanddenim says
Yep… I painted the bowl and backsplash, too. With a small roller and I got the corners with a foam brush. Took a few coats but it worked!
Peggie Russo-Millard says
Can it this product be used on Culture Marble?
ducttapeanddenim says
I’m pretty sure it can be. Double check the package and/or their website.
Vickie Kuykendall says
Looks great! What a difference!
Cheryl says
You did a good job. I suck at painting and it was easier to buy a new sink!
Kim~madeinaday says
Great job! Sharing on FB. Thank you for sharing on Merry Monday! Hope to see ya next week!
Kim
Courtney @ Pop It Up Girl says
Totally did not know you could paint a sink! Love this!
Brenda Young @Unique Junktique says
I had no idea this could even be done! I would love for you to share your project tonight at #FridaysFurnitureFix, hope to see you there!
Susan says
Wowza! What an improvement. I am pinning for when we finally tackle the kids’ bathroom redo. Thanks for sharing at the This Is How We Roll LInk Party.
Rachel Teodoro says
Just wanted you to know that I featured this on create link inspire party. Thanks for linking up.
Toni | Small Home Soul says
Ann this turned out great! I’d love to try this on my faux granite sink in my bathroom. It’s pretty scratched up. I hope it hold up really well for you, there are so many great products out today to save us big $$
Tracey says
Now that it has been a while, is the paint still holding up? I’m hoping to do this to my bathroom that has a sink that looks very similar to your original one! Would must rather paint it than by a whole new one at this point!
ducttapeanddenim says
Yes, it is! I still love it. And we just had our bathtub painted. (I was afraid to do that myself!)
Leigh says
How do you clean it? Any special instructions?
ducttapeanddenim says
Just no abrasive cleaners. I’ve just been using all purpose spray or Windex when I clean the mirror.
Ina says
I bet u could add in food coloring or something… and what website do u use to create ur blogs… is it free… I’m wanting to do my own and I don’t have any idea where to start and how much I could make….
Ms Rogers says
Hi there, I think this is a great idea. Right now I live in Vegas, and there are some beautiful hand-painted sinks (besides the primary color, there are beautifully hand-painted sinks of flowers) at some of the hotels, and I think they are just wonderful. But way too expensive, I’m sure. When I work on my farmhouse next year, I was thinking how I might be able to hand paint some flowers on a sink (since after all, the farm is a lavender farm). Do you have any recommendations for paint to be used on a sink in smaller, less expensive quantities (since there may be many colors in the painting)? Thanks so much! Great job on your sink!
Becky says
Did you seal it? Now it’s 2019: how has it held up?
ducttapeanddenim says
I just used the paint kit. We sold the house in December 2018 and it was still in great shape. We never had any chips or anything.
Cindy Sonntag says
Can I use this product on a plastic RV sink?
ducttapeanddenim says
I don’t see why not. But you may want to check the Rust-Oleum website. And make sure you have plenty of ventilation while you’re painting… it’s stinky!
Lisa says
I am hoping to paint my stove top. It is a separate unit from my oven. Do you think I could the same product?
ducttapeanddenim says
I don’t think so. But Rustoleum and Krylon both make a high heat spray paint. Here’s my affiliate link: https://amzn.to/30HZxHE — I haven’t used it but I have used their appliance paint on my washer and dryer and it worked great. Good luck. Let me know how it turns out.