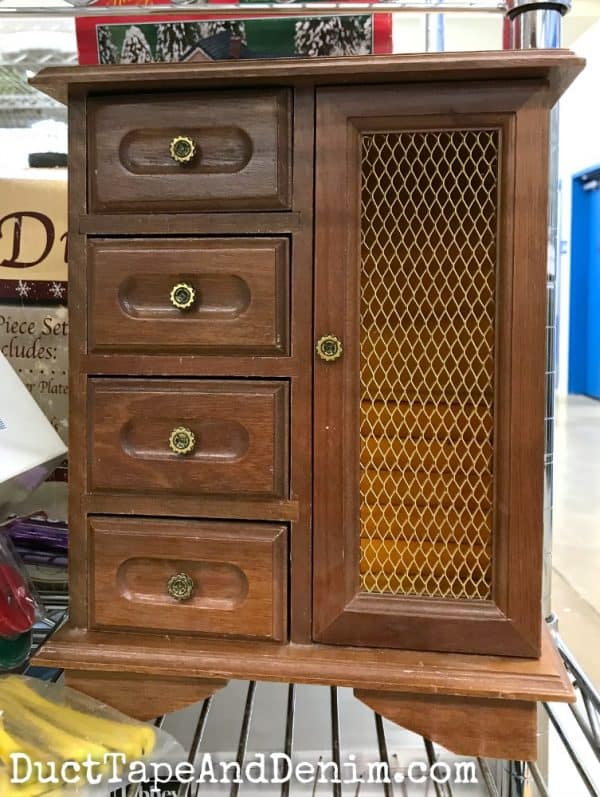
Welcome to our monthly thrift store challenge! Today I’m sharing my current favorite paint finish… I’m calling it a boho paint finish. This is out of the box for me! I’m working on expanding my color palette and this finish definitely expanded it! After you read my tutorial, make sure you scroll down to see what everyone else in the challenge made this month. Here’s what the jewelry cabinet looked like when I found it at the thrift store.
NOTE: Now available in my Etsy shop! So take a look if you don’t want to paint one for yourself!
This post contains affiliate links. You won’t pay any more when you use these but I will earn a small commission on any purchases you make after clicking on them and I greatly appreciate it. Thanks for helping support my little blog!!!
The Rules:
- Upcycle an item(s) from a thrift store, resale store, or garage sale into a new piece of decor.
- There’s no monthly theme.
- There’s no budget to stick to.
Meet the Hosts
Amanda | Domestically Creative
Angela | Simply Beautiful by Angela – Michelle | Michelle James Designs
Molly | Just a Little Creativity – Victoria | Dazzle While Frazzled
Marie | The Inspiration Vault – Marie | DIY Adulation
Lynne | My Family Thyme – Gail | Purple Hues and Me
Jennifer | Cookies Coffee and Crafts – Ann | Duct Tape and Denim
Michelle | Our Crafty Mom – Debra | Shoppe No. 5
Denise | My Thrifty House – Florence | Vintage Southern Picks
Deborah | Salvage Sister & Mister – Yami | The Latina Next Door
Pili | My Sweet Things – Kathleen | Our Hopeful Home
Karen | Dragonfly & Lily Pads
Make sure you follow our board on Pinterest for more upcycled decor inspiration!
Supplies Needed for Boho Paint Finish
- 2 shades of turquoise chalky type paint – I used Americana Decor Chalky Finish Paint, in Escape and Treasure.
- coral acrylic paint – I used Watermelon Slice.
- light green paint – I used Americana Decor Satin Enamels in Moss Green
- white chalk-type paint – I used Everlasting.
- burnt umber acrylic paint
- glazing medium
- spray bottle
- paint brushes – This is my favorite paint brush.
- palette knife
- painters tape
- sanding sponge
- felt – to match felt inside cabinet
- scissors
- craft glue
- craft heat gun
How to do a Boho Paint Finish
Scroll down to watch the video. It’s long but it might be easier to understand the steps.
Prep:
I started by cleaning the jewelry cabinet with a damp rag and taping the areas I didn’t want to paint, including the wire in the door and the insides of the drawers.
Step One: Base Coat
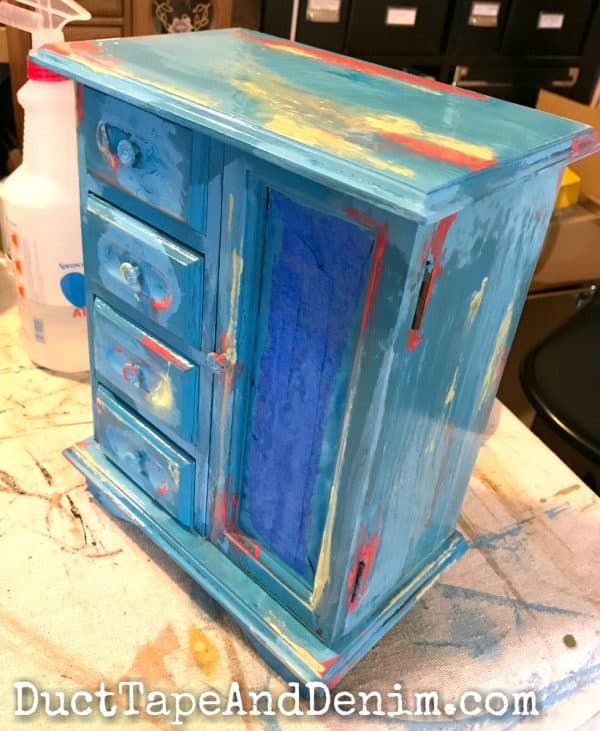
I painted the entire jewelry cabinet with the two blue paint colors, not cleaning my brush in between. While that was still wet, I came back with my palette knife and added the contrasting colors in random places. I sprayed it with water and smeared it slightly with my palette knife.
Notice I painted this with the drawers IN. I let the water drip down the sides and front.
Using a palette knife allows the colors to move around a bit but they don’t blend together like if you were using a brush.
Honestly, at this point I thought I’d ruined it. Not very pretty, right?
I used my heat gun to dry the paint, holding it close to the contrasting colors. The heat will make the acrylic and enamel paints bubble… don’t worry… that’s what you want. You can see this in the video below.
When everything was dry and had cooled off I sanded it well with my sanding sponge.
Step Two: White Wash
Next, I painted a thinned down coat of white paint over the whole cabinet.
After it dried, I sanded again, focusing on the corners to give it a distressed look.
Step Three: Glaze
Then I mixed a little burnt umber with the glaze and brushed it on and wiped it off with a rag. When that was dry I gave it a final sanding.
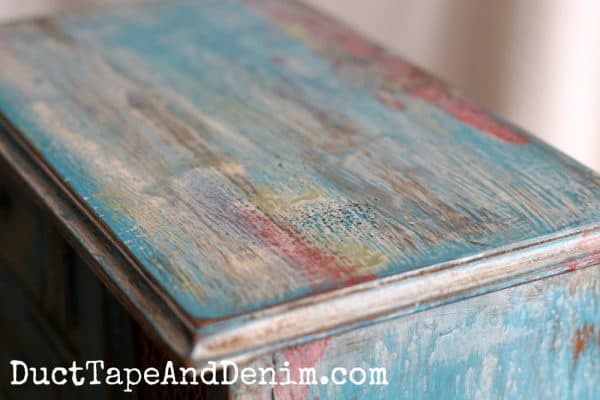
See what a great texture the heat gun gives the paint?
I love that multi-layered paint look.
Here’s the Facebook Live video where I showed how to do this method on a photo holder board.
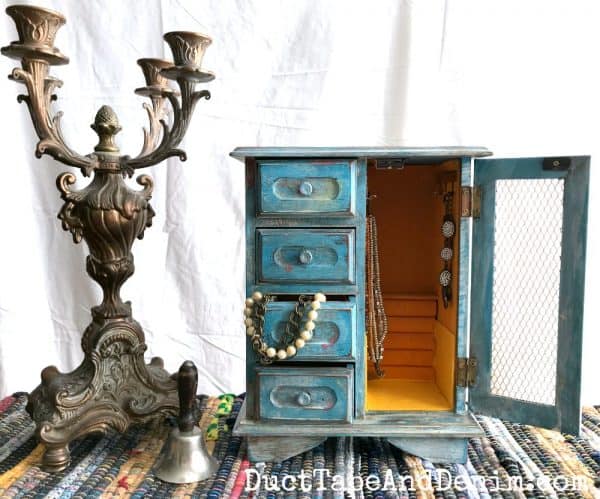
I did get a little crazy with the water bottle on this one and ended up getting paint inside the door. So, as you can see, I covered up the paint stains with some fresh felt.
What do you think?
{{{ Join our Thrift Store Makeover group on Facebook and share photos of your projects! }}}
Is it a keeper?
If you enjoyed this boho paint finish, you might also like these articles:
- The Ultimate Guide to Jewelry Box Makeovers
- 7 Alternative to Glass Doors in Your Jewelry Cabinet Makeovers
- Red Jewelry Cabinet Makeover with Paint, Stencils, & Metallic Wax
- Boho Paint Finish Tutorials
- How to Layer Paint on Furniture
Thanks for reading! Now… check out what my blogging friends made!
‘Til the next project,
Ann @ Duct Tape and Denim
Pinterest | Instagram | Facebook | Twitter | Etsy | YouTube
 We join these blog parties. Featured on Crafty Weekends.


Fonda says
I can tell you I was a little worried there for a minute with all those garish colors. Then you toned them down to something I could live with. Great project!
ducttapeanddenim says
lol.. Believe me… I was too! I almost quit in the middle of the project.
Annie says
When you say glaze what do you mean
ducttapeanddenim says
Thanks for your question… I mix my paint with a glazing medium that keeps it from drying so quickly. Then I brush it on and wipe it off. The glaze settles into the details and makes them really stand out.
Angela at Simply Beautiful By Angela says
Ann this is fantastic! I adore that fnish, wonderful job! 🙂
Jewels says
I love it and boho is the “it” style of the moment it seems! I can’t wait to see your next foray into boho!
Amanda | Domestically Creative says
Wow!! That is a really cool technique! Kudos to you for being brave enough to do it because the final product is gorgeous!
Victoria @DazzleWhileFrazzled says
Very cool, great transformation! Love all the colors you used to make it look so old and vintage-y. Visiting from Thrift Store Challenge.
Deborah says
THAT IS SO COOL!!!!!!!!!!!
Jenny says
I’ve never heard of boho paint before, but it came out great. The colors look amazing!
Florence @ Vintage Southern Picks says
Ann, I love it. That first photo was a little scary, but I knew you would come up with something to save the day, and you sure did. I like the way everything melds together.
Debrashoppeno5 says
I like what you did with this finish. It really looks great and so current.
Michelle James says
Wow this is a great painting technique. I always tend to paint then distress but these results are stunning! I love the blue with the contrasting colors and the fun heat tool texture. Ah-Mazing!!!
Pam Jackson says
Great color and fantastic job, well done.
Nikki Gwin says
I love this paint style. I actually painted my front door very similar, but then decided that our house style just didn’t work with my paint endeavor, so I painted over it. I will have to try it on a smaller scale now. Anyway, I am featuring your jewelry cabinet makeover on this weeks OVER THE MOON LINK PARTY which goes live on Sunday evening at 6 Eastern. Thanks for linking up and join us again this week!
🙂 gwingal
Sheri says
Love it! Thanks for sharing at the To Grandma’s House We Go DIY, Crafts, Recipes and More Link Party! Hope to see you again this week!
Jann Olson says
Fun technique! Thanks for sharing with SYC.
hugs,
Jann
Sherry says
Super cute. Thanks for sharing at Home Sweet Home.
Karren Haller says
What a fantastic change, it is wonderful to take something old and make it new!!!
Thank you for sharing on Friday Features #omhgff on Oh My Heartsie Girl, your post being featured this week and will be shared on Instagram, watch for it.
It will also be pinned on Pinterest and shared to Facebook.
Now I hope you enjoy the little boost, and stop by again to share.
Have a great weekend!
Karen Howard says
Hi There! I just signed up! Love Your Makeover of the Jewelry Cabinet. These are easy to find at Savers or other Thrift stores. I actually have a cabinet w/ 2 doors & 3 lg. & 3 sm. draws inside. No mirror. And I got a sm. Glass Top Wooden Box from Savers for $1.99. It was Spring Green, & I painted it Carribean Blue. It had a Butterfly under the glass& I added a few other things in w/it.(Glittered Fairy Stickers & Flowers). I like the way it came out& it matches my decor better now. I keep some larger shells in it for my crafting projects. I’m looking forward to your emails w/new repurpose projects/crafts. 😃
ducttapeanddenim says
Thanks for joining us! Hope you have lots of fun painting your jewelry cabinets!!!