Recently we tackled one of the biggest DIY projects that we’ve done in a while. Today I’ll share with you how to remove carpet from stairs and stain the wood underneath.
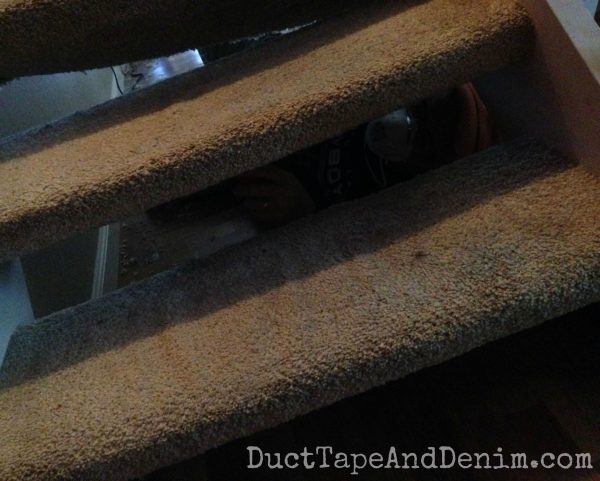
Here’s what the stairs looked like before… Kind of like a giant cat toy! Our cat loves playing on the stairs and had even clawed through to the padding in one spot! We live in a townhouse and I really do love the open stairs but not when they looked like this!
Warning: This next picture is disgusting. You may want to scroll by it quickly! But, unfortunately, that is what our stairs really looked like before this project.
So in one day my husband and daughter pulled out the carpet and padding from the hall (that’ll be another post!) and stairs. He used a carpet knife and sliced it open from one side to the other and then just pulled off the carpet and padding. Gloves were an important part of this process, too, those staples are painful little buggers! But this was the easiest part of the whole process!
Every time we’ve done this and seen what’s under the carpet we say “no more carpet… EVER!!!” FYI, it’s nasty under your carpet!

After vacuuming up all that nasty stuff it took the three of us working for the next two days to pull out all the staples. My tack puller became my favorite tool! But I needed a pair of pliers to get the little parts that broke off.

Here’s what we found under the carpet… Rough wood. But I wanted a rustic look so I felt like this would work.
There was some paint that needed to be removed. I guess the builders didn’t think anyone would ever take the carpet off so they didn’t really care if paint spilled or not.

A little scraping and a quick run with an orbit sander got rid of the stains and here’s what we were left with:

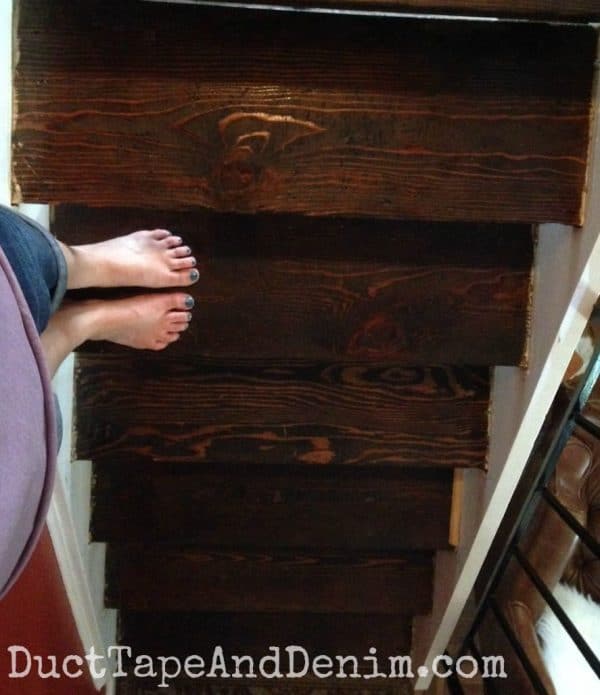
Now the music man handed it back over to me for the finishing touches.
I wiped on Minwax Wood Finish in dark walnut. The label said it needed 8 hours to dry completely so I made sure I had everything I needed from upstairs, put the cat out, and started staining from top to bottom.
I think I cheated a little and didn’t wait the full 8 hours but when it was completely dry I started on the finish coat of Minwax Polycrylic. This time I did every other stair since it was getting late and I really wanted to sleep in my own bed that night.
We had people recommend that we start at the bottom and work up right before bedtime. But I’m glad we didn’t do that cause it took longer than we expected to dry. It was tacky for over 24 hours. Maybe because of humidity or temperature?
The next day I finished the odd-numbered stairs. I decided not to sand them because I didn’t want a slick finish on my stairs. And here’s what they looked like:

We also ordered these sisal carpet stair treads from Amazon. I love how they look but I’m going to wait until winter to put them on. I’m enjoying feeling the bare wood under my feet right now.
We still have the trim to put in but because of work schedule have put that off for a while. I really don’t mind because I’m so excited not to be walking on that giant dirty cat scratching pole. So I may have to share another photo with you in the winter with the trim and carpet runners.
Looking back, it was worth all the work!
Leave me a comment and let me know if you’ve ever pulled up any carpet in your home. And if you have, what did you find underneath?
‘Til the next project,
Ann @ Duct Tape and Denim
Pinterest | Instagram | Facebook | Twitter | Etsy | YouTube

Jackie says
does the minwax make the stairs so they aren’t slippery?? that is my only issue about not having carpet or a runner?
ducttapeanddenim says
Jackie, Thanks for your comment. No, this Minwax finish isn’t slippery at all. I bought runners just in case but we STILL haven’t used them!
Beverly says
We have lived in our home for bout 15 years. It is now 100 years old. The carpet was disgusting from the dogs and me doing craft projects on it. It was near our community garbage pick up day when I decided to remove the carpet from the living room and entryway. I was disappointed. The previuos owner had removed some of the hardwood floor and replaced it with plywood. I could see where there had been a carpet that was in the middle of the hardwood floor. Later, I removed the carpet from two upstairs bedrooms, the hallway, and the stairs. The hardwood on the stairs and in one bedroom is in good condition. The hardwood floor in the other bedroom is in okay condition, but will need some work. I’ve thought of making canvas rugs or flooring. I’min the middle of downsizing, so after I purge my belongings, I’ll have space to upgrade the hardwood floors.
ducttapeanddenim says
So much work! But it’s worth it!!!
GINETTE says
I just moved into a rented house and would like to remove the carpet leading to my basement. My landlord said that they are glued to the stairs. I would like to know how I can remove the carpet and the glue without spending the rest of the summer indoors. The carpet is nasty. Can carpeting be put over old carpet? HEPL PLEASE. Thank you in advance.
ducttapeanddenim says
oooooo….. Luckily, none of the carpet we’ve ever removed has been glued. But I did a quick search on YouTube and found a few videos that might help: https://www.youtube.com/results?search_query=how+to+remove+carpet+glued+to+stairs
Let me know if you try it. I’d like to know how it turns out.
FL says
Hi Hi
So we got the same exact stairs with old carpet 🙁
I like your work and how it turned out!! Great job!
Do you have pictures that you can share with the trim installed on your stair. Thanks!
ducttapeanddenim says
not yet… hopefully soon.
Susan says
I have 2 old brick
Stairs covered in carpet, nasty.
How can I make stairs attractive again
ducttapeanddenim says
I’d pull the carpet off for sure. Then, depending on how the brick looks and the style you’re going for you could either paint it, seal it, just clean it, or re-carpet it again. Let me know how it goes.
A says
We too have the exact same stairs in our townhouse and our carpet needs to go – thank you so much for this! What did you do at the top of the landing? Are you putting wood floors in or carpeting?
ducttapeanddenim says
We put a vinyl plank floor in the hall at the top of the stairs. Check it out here: https://ducttapeanddenim.com/our-hall-makeover-with-vinyl-plank-flooring/
Sheila says
I did it the other way around. My staircase was open and stained and I carpeted it. The stairs always looked so dusty and it was much nicer walking down on carpet than hardwood.
luiessir says
¡Buen trabajo, qué maravillosa madera ha aparecido!.
Shirley Blair says
Not every staircase is made out of real wood. This would probably not work if the stairs is made of pressed wood???
Your opinion, please.
ducttapeanddenim says
Probably not. We were taking a chance and ready to re-carpet if they didn’t look good. But it ended up looking really nice. Thanks for reading.
Alicia Hursley says
Thanks for sharing this! We are trying to complete a house flip that all started with a cabinet door replacement. We had a few dollars left over after all was said and done so we decided to invest them back into this project. We are so excited to see how the stairs turn out.