This post is part of my Blogging 201 series where I’m sharing what I learned at my first blog conference, Snap Conf. Today’s topic is how to create a Google spreadsheet to organize blog posts and get more traffic to your blog. I’m slowly getting all my notes posted but it may take a while. I took a LOT of notes!
This post contains affiliate links. You won’t pay any more when you use these but I will earn a small commission on any purchases you make after clicking on them and I greatly appreciate it. Thanks for helping support my little blog!!!
How to Create a Google Spreadsheet to Organize Your Blog Posts and get More Traffic
I didn’t really learn this at Snap Conf. The girls at Classy Clutter shared how they used Google Drive to organize their blog and get more traffic. I’d never used it before so I had to go in and learn it on my own. (I have another post with more notes from their class on organizing your blog.
If I didn’t know how to do it, I figured some of you wouldn’t either. So here are step-by-step instructions. If there’s anything you don’t understand please leave a comment and I’ll try to clarify it for you.
FYI, you could also use any spreadsheet software you already have but you couldn’t share it in the same way. I’ve enjoyed Google Drive because it’s easy to share with virtual assistants, design teams, and brands I’m working with.
We’ll start with my master list of blog posts.
First, go to docs.google.com/spreadsheets. The top of the page should look like this (A list of your current sheets will be right below, if you already have any. I cut mine off.):
Next, click on the square with a big green + sign that says “Blank”. Your next screen will be an empty spreadsheet that looks like this:
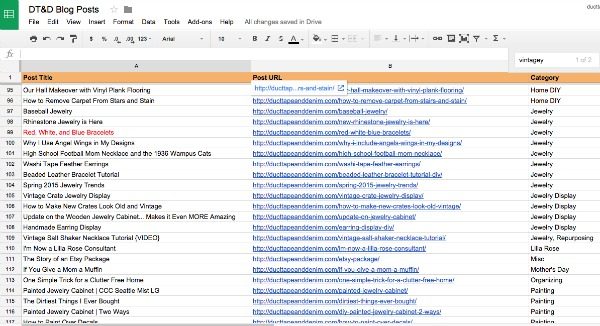
Name your spreadsheet by clicking in the box that says “Untitled spreadsheet”. Then create your column titles. I title my columns “Post Title”, “Post URL”, and “Category”. I’m playing around with the idea of adding other columns like one to add a note when they’re updated and ready to share.
You could also add a column for notes if you’re sharing your sheet.
Here’s what my sheet looks like:
I like filling the top row with a color to make it stand out. I also “freeze” it so it stays at the top of the page as I scroll through. You can do that by clicking on the row and then “View”, “Freeze”, then “1 row”.
Why take the time to do this?
One, because I can sort this list by topic, when I’m ready to schedule my social shares for a holiday or season I can quickly go back to my posts from previous years, cut, and paste the urls into Facebook or Twitter for this season.
Two, I can easily create a roundup of my past blog posts by topic.
Three, I can browse through and see which topics I might need to write more about.
Four, I can remember what I’ve written about. LOL… yeah, I’ve been blogging for 10 years now and sometimes I surprise myself by what I find on my own blog!
Now that you know HOW to create a Google spreadsheet go back and read how to use them to get more traffic to your blog.
If you’re looking for more blogging tips follow my Pinterest board.
Follow Ann @ Duct Tape and Denim’s board Business | Blogging.
If you enjoyed this post, you might also like these:
- How to Organize Your Blog Posts and Get More Traffic
- Classy Clutter Snap Conf Presentation
- Inspired Bloggers University
- Blog Success Planner
- Branding Your Blog (coming soon)
Quick commercial for all you bloggers that are still reading! Have you heard of Tabitha Philen? I’ve been following her on Periscope and bought her Blog Success Planner to use this year. I’m loving it! It’s almost 200 pages of charts, forms, and calendar pages to REALLY get your blogging organized!
‘Til the next project,
Ann @ Duct Tape and Denim
Pinterest | Instagram | Facebook | Twitter | Etsy | YouTube
Sign up for my email list & get a 20% off coupon code!


Shannon says
Great resource! The “How to Organize Your Blog Posts and Get more Traffic link at the bottom doesn’t work. ;(
Michelle says
Awesome post! As a new blogger, I appreciate this idea and am implementing right away. Thanks for sharing!
Edos Ubebe says
Amazing post, thanks for this awesome information. I never ever thought of this strategy before. I have learned a new thing today. Thanks to you.
catherine williams says
I love your info on how to organize posts with google spreadsheet. Can you tell me how I get a URL for my posts? thanks
ducttapeanddenim says
I just copied and pasted what’s in the search line… but if you use WordPress it will also show up at the top of your edit page.